This information is for educational purposes. Keyboard work involves small parts, soldering irons, and electronics — work in a ventilated space when soldering, unplug boards before opening them, and modding a board may void its warranty. When in doubt, check the manufacturer's documentation first.
The cheapest keyboard mods change more than the expensive ones. A roll of painters tape, a sheet of foam, two band-aids and an afternoon will do more for how your board sounds and feels than a $200 board swap — I have run that exact comparison on my own bench, same mic, same distance, same desk, and the tuned budget board wins more often than anyone selling boards wants to admit.
This is the hub for the whole cheap-mod series. Below I walk every mod I keep coming back to — tape, PE foam, the band-aid mod for the PCB, the tempest mod, desk mats, o-rings and the one that isn’t cheap in time at all, lubing — and I tell you honestly which your fingers will feel, which your ears will catch, and which just feed the drawer. Each section links to a full standalone guide if you want the step-by-step.
What “cheap keyboard mods” actually means
A cheap mod is one where the consumable costs less than a takeaway lunch and the only other thing you spend is time. Tape is a couple of dollars. A PE foam sheet is single digits. Band-aids you already own. O-rings are maybe eight dollars for a bag that does several boards. None of these touch the electronics, none of them are permanent, and every one is reversible in the time it takes to pull the plate back out.
What they are not is magic. The hobby has a habit of filming a mod with a phone mic six inches from the spacebar and calling a tiny room-tone difference “completely transformed.” I have a whole standing complaint about that, and it is why every recording I make uses one mic, one distance, one desk, stated every time. Treat any sound test you cannot reproduce as marketing. The mods below are real — but the size of the change is usually smaller than the video promised, and that is fine, because you are stacking small honest changes for the price of pocket change.
The mods, ranked by what you actually notice
Here is the honest order. If you do nothing else, do the stabilizers and the tape mod — those two give the biggest felt and heard return for the least money. Everything after that is refinement, and refinement has diminishing returns the deeper you go.
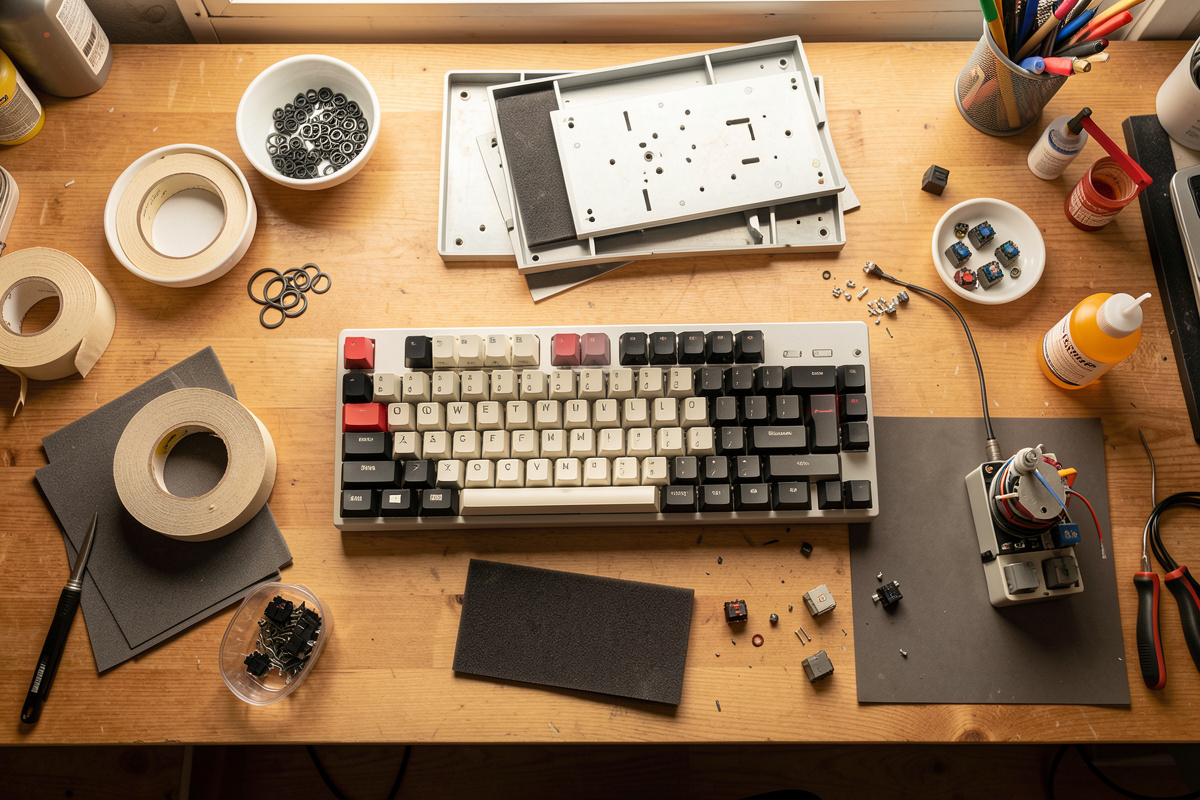
The table below is how I rate each mod after running them on a stock budget 60%, my hotswap daily driver, and the aluminum 65% I soldered myself. “What it changes” is the honest version, not the thumbnail version. Cost assumes you are buying the consumable, not the whole tool kit.
| Mod | Cost | Difficulty | What it actually changes | Reversible? | My verdict |
|---|---|---|---|---|---|
| Stabilizer tune | Under $10 | Medium | Kills rattle on the big keys, the loudest fault on most boards | Yes | Do this first, always |
| Tape mod | $2-$3 | Easy | Slightly deeper, more solid sound; small but real | Yes | Best dollar-for-effort mod |
| PE foam mod | $5-$10 | Easy-Medium | Cleaner, more uniform sound; removes hollow ring | Yes | Worth it on hollow cases |
| Band-aid (PCB) mod | Under $2 | Medium | Dampens PCB flex and bottom-out harshness on stiff boards | Yes | Situational, not universal |
| Tempest / force-break | $3-$8 | Medium | Breaks up empty-case echo without deadening everything | Yes | Great on big empty cases |
| O-rings | ~$8/bag | Easy | Shortens travel, softens bottom-out; changes feel more than sound | Yes | Misunderstood; niche use |
| Desk mat | $0 (own one) | Trivial | Decouples the board from a hard desk; quiets surface ring | Yes | Free win you already have |
| Switch lube | $15-$25 kit | Hard (time) | Smoother keystroke, less spring ping; deepest feel change | Yes | Huge payoff, huge hours |
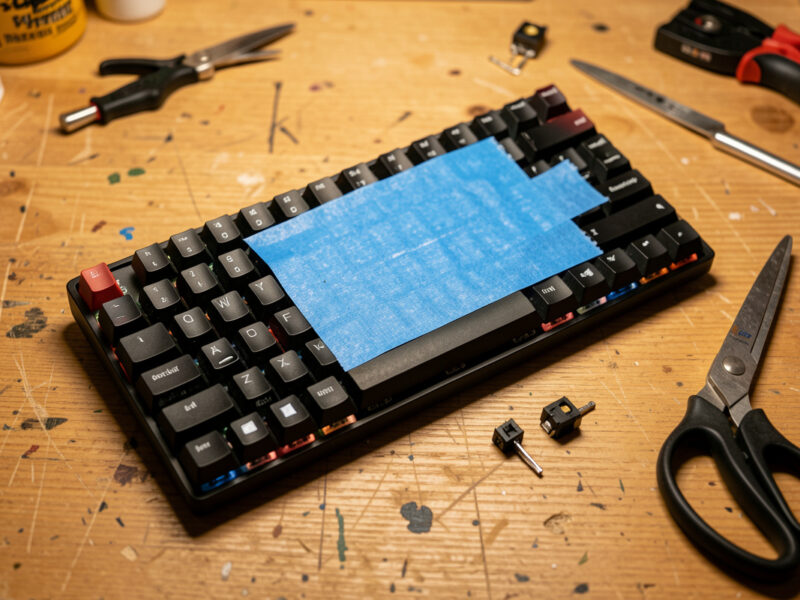
Tape mod: the five-minute place to start
The tape mod is strips of painters tape on the back of the PCB, under the switches. It reflects sound back up instead of letting it die in the case, and the result is a slightly deeper, more solid signature. On a hollow budget board it is genuinely audible. On a foamed aluminum case it is nearly nothing — there is no hollow left to fill.
I reach for plain blue painters tape because it peels clean and leaves no residue. Two or three layers is the usual range; past that you are mostly fooling yourself. It costs a couple of dollars, takes five minutes, and undoes in thirty seconds. If you only ever do one mod on this whole list, do this one after you tune the stabs. The full walkthrough — layer counts, where it helps and where it does nothing — is in my tape mod guide.
PE foam: the case mod everyone reaches for next
PE foam is a thin sheet that sits between the plate and the PCB, or between the PCB and the case, depending on your board. It cleans up the sound — kills hollow ring, makes the keystroke more uniform, and tightens up the looser high frequencies. It is the mod most people credit with “transforming” their board, and on a cheap hollow case they are not wrong.
The catch is fit. You have to cut the sheet to your plate, punch holes for the switch pins on a hotswap board, and not pinch anything. Done sloppily it causes switches not to seat or, worse, intermittent key chatter. Done right it is one of the most satisfying cheap upgrades there is. I keep a sheet in the drawer and cut a new one whenever I rebuild. Cutting templates, thickness choices and the hotswap hole problem are all in the PE foam mod guide.
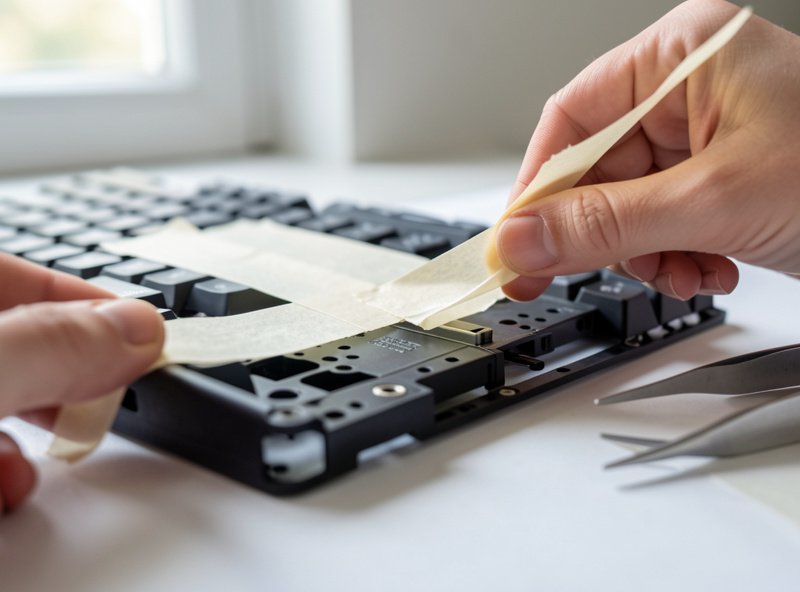
The band-aid mod for your PCB: force-break dampening
Worth being precise here, because there are two different mods that share the name. The classic band-aid mod for stabilizers puts a small fabric pad under the stabilizer wire to cushion the click — that one lives in stabilizer-tuning land. The mod I mean here is the band-aid placed under the PCB, against the case standoffs, to cushion PCB flex and take the harsh edge off bottom-out on a stiff tray-mount board.
It is genuinely cheap — a couple of band-aids — and genuinely situational. On a flexy gasket board it does almost nothing because the board already gives. On a rigid tray-mount budget case where every keystroke meets concrete, it softens that harshness in a way you feel more than hear. I keep it in the toolkit for exactly that case. The placement, how many pads, and how to tell whether your board even needs it are in the band-aid mod for PCB guide.
The tempest mod: emptiness, tuned
The tempest mod — sometimes called a force-break mod — runs a thin strip of material across the empty floor of the case to interrupt the air space, breaking up the echo of a large hollow cavity without packing it solid the way full foam does. The point is to keep some character and openness while losing the cheap “empty plastic box” reverb.
It shines on big cases with a lot of dead air under the PCB — full-size boards, tall budget cases. On a dense little 60% there is barely any cavity to tame, so the effect is small. I treat it as the alternative to drowning a case in foam when I still want the board to breathe. Materials I have actually used, strip placement, and the difference between tempest and full PE foam are in the tempest mod guide.
O-rings: the most misunderstood eight dollars in the hobby
O-rings slip onto the switch stem (or, on some, the keycap stem) and stop the keycap before it slams the housing. They shorten travel a touch and soften the bottom-out. Here is the honest part nobody puts in the thumbnail: o-rings change feel far more than they change sound, and a lot of people hate the mushy bottom-out they introduce.
They are not a noise-killing miracle. They take the sharp top off bottom-out, but they also rob the crisp, intentional stop that good switches give you, and the travel reduction annoys typists who like full depth. I use them in exactly one scenario: a shared room where I want to take the edge off a loud board without rebuilding it, and I accept the softer feel as the price. Durometer choice, thickness, and who should actually skip them are in the o-ring dampener guide.
The desk mat: the mod you already own
This is the one people skip because it costs nothing, and it is one of the most effective. A keyboard sitting on a bare hard desk couples into the surface and the surface rings — you are hearing the desk as much as the board. Put the same board on a thick cloth-and-rubber desk mat and the surface ring drops away, the sound tightens, and the whole thing feels more planted.
I have recorded the same board on bare desk and on a mat with my standard setup and the difference is one of the larger free changes you can make. If your desk is glass or thin laminate, it is even bigger. Before you spend a cent on foam, put your board on a proper mat and listen. Mat thickness, materials and the surface-ring problem are covered in the desk mat sound guide.
Lube: the mod that is not cheap in time
Lubing belongs on this list because the materials are cheap — a small kit does hundreds of switches — but I will not pretend it is a cheap mod, because the currency it costs is hours at the lube station. It is also the single biggest change to how a keystroke feels: scratch disappears, spring ping dies, the whole stroke goes glassy. Nothing else on this list comes close on feel.
If you have never done it, start small and start informed. I wrote a dedicated beginner lube guide for the first-timer, and the deeper material — lube choices, films, the batch workflow — lives in the complete switch lubing and filming guide, the Krytox vs Tribosys breakdown, and my honest is-it-worth-it math. If you only have one evening, lube your stabilizers and skip the switches for now — that is the high-leverage subset.
Matching the mod to your board
Not every mod belongs on every board, and the construction of yours decides which ones earn their keep. After running this series across my four reference boards — a hotswap daily, a self-soldered aluminum 65%, a stock budget 60% and an Alice-layout experiment — the pattern is consistent enough that I can save you some wasted afternoons.
On a cheap plastic tray-mount board with a hollow case, you get the most dramatic returns: tape, PE foam and a tempest mod all have a lot of hollow to work with, and the band-aid mod genuinely softens the harsh bottom-out of a rigid tray. This is the board where forty cents of consumables sounds like a different keyboard. On an aluminum gasket-mount build, most of these mods do far less — a good gasket board already has dampening foam, a flexible mount and a dense case, so tape and foam barely register and the band-aid mod does nothing because the board already gives. There, lube and a desk mat are the only mods left that move the needle.
Hotswap versus solder changes the work, not the mods. On a hotswap board you can pull switches by hand to do the tape or foam mod, which makes everything faster; on a solder board the plate-and-PCB assembly comes out as a unit, so a foam cut has to be right the first time. Either way the mods themselves are identical. The one real constraint is the PE foam hole-punching on hotswap boards, where the sockets sit proud of the PCB and the foam has to clear them or switches will not seat.
What the cheap mods cannot fix
Honesty is the whole point of this site, so here is the limit: these mods shape a board, they do not rescue one. No amount of tape makes a scratchy switch smooth — that is a lube or replace problem, not a case problem. Foam will not fix stabilizers that rattle, because rattle lives in the wire and the housing, not the cavity. And nothing on this list changes a layout you do not enjoy typing on; if a 60% frustrates you because you keep reaching for arrow keys, the fix is a different board, not a mod.
The biggest misallocation I see is people foaming and taping a board whose real problem is untuned stabilizers, then concluding the mods “did nothing.” The mods did exactly what they do — they just were not aimed at the actual fault. Diagnose first. If the loudest thing you hear is the spacebar and the big keys, that is stabilizer rattle and you want the spacebar rattle fix and a proper stabilizer tune before you touch a roll of tape. If the keystroke itself feels gritty, that is the switches, and you are in lube territory. Match the mod to the symptom and the cheap mods look like magic; aim them randomly and they look like a waste.
The mistakes I see most often
A few failure modes come up again and again, and all of them are avoidable. The first is too many tape layers — people read that two layers helped and assume six will transform the board. Past about three layers you get diminishing, then negative, returns, and you risk the tape interfering with how the PCB seats. The second is a sloppy PE foam cut that pinches a switch pin or covers a hotswap socket, which shows up as a dead or chattering key and sends people chasing electrical gremlins that are really a craft problem.
The third is the wrong o-ring durometer — too hard and you feel nothing, too soft and the board turns to mush — followed closely by expecting o-rings to be a sound mod when they are a feel mod. The fourth, and the one I am most guilty of preaching against, is judging any of this from an uncontrolled recording. If you move the mic, change the desk, or record at a different time of day, you are comparing two different things and crediting the mod for the difference. Same mic, same distance, same desk, every time — that is the only way these comparisons mean anything. The last mistake is over-foaming: stuffing a case until it is dead silent and personality-free, then wondering why the board sounds like a membrane keyboard. Restraint is a skill here.
How I actually test these
Every claim above comes from the same routine. Same condenser mic, same distance, same desk, same set of test boards — a stock budget 60% as the “before,” my hotswap daily as the value reference, and a self-soldered aluminum 65% as the high end. I record before, do the single mod, record after, and listen on the same headphones. One variable at a time.
That sounds obsessive and it is, but it is the only way to separate a real change from the placebo that floods this hobby. Half the “transformations” online are a different mic position and a louder edit. When I tell you the tape mod is real but small and the desk mat is free but large, that is a controlled before-and-after, not a vibe. You can do a rough version of this at home with any phone, as long as you do not move the phone between takes.
A sane order to do them in
If you are starting from a stock board, this is the sequence I would actually follow, cheapest and highest-impact first: put it on a desk mat, tune the stabilizers, do the tape mod, then listen. For most people that is most of the available improvement for under ten dollars and one evening. Only if you still want more do you move to PE foam, then a band-aid or tempest mod if your specific case needs it, and finally lube — the time sink — last.
The mistake I see constantly is people buying a switch-and-board upgrade before they have spent five dollars and an hour tuning the board they already own. A tuned $75 board beats an untuned $200 board to my ears, every time. Mods first. If you are still choosing hardware, my first custom keyboard guide and the best hotswap board under $100 are the honest starting points, and the 65% vs 75% breakdown sorts out layout.
What to buy
Deliberately short, because this is a cheap-consumables series and the whole point is that you do not need much. Plain blue painters tape for the tape mod, a sheet of PE foam if your case rings hollow, a bag of switch o-rings if you want to experiment with feel, and a basic switch lube kit when you are ready for the time investment. Band-aids and a desk mat you almost certainly already have.
As an Amazon Associate I earn from qualifying purchases.
Frequently Asked Questions
What is the cheapest keyboard mod that makes a real difference?
Tuning the stabilizers and the tape mod. Together they cost under five dollars and one evening, and they fix the loudest fault on most boards (stabilizer rattle) and add a deeper, more solid sound. Both are fully reversible.
Do cheap keyboard mods damage the keyboard?
No. Tape, PE foam, band-aid, tempest, o-rings and desk mats are all non-permanent and reversible without tools beyond what disassembles the board. None of them touch the electronics. The only risk is a sloppy foam cut causing a switch not to seat, which you fix by re-cutting.
Which mod should I do first?
Put the board on a desk mat, then tune the stabilizers, then do the tape mod. That order gives most of the available improvement for under ten dollars before you ever buy foam or lube.
Will the tape mod or PE foam make a quiet keyboard?
Not on their own. They change the character of the sound more than the volume. For a genuinely quieter board you want silent switches or o-rings to soften bottom-out, plus a desk mat to kill surface ring. Mods shape sound; they do not mute it.
Are o-rings a good mod for beginners?
They are cheap and easy, but they change feel more than sound and many typists dislike the softer, shorter bottom-out they create. Try them knowing they are a feel preference, not a universal upgrade, and be ready to remove them if you miss full travel.
Do I need to lube switches to get a good-sounding board?
No. You can get most of the way there with stabilizer tuning, tape, foam and a desk mat for under ten dollars. Lube is the deepest feel change but it costs hours, not money. Treat it as the last step, not the first.
Related Guides
- The Tape Mod: A Five-Minute Sound Upgrade
- PE Foam Mod: Cutting, Fitting and What It Changes
- Band-Aid Mod for the PCB: Force-Break Dampening
- The Tempest Mod: Taming an Empty Case
- Desk Mats and Keyboard Sound: The Free Mod
- O-Ring Dampeners: The Honest Take
- Lubing Switches for Beginners
- Stabilizer Tuning: Fix the Rattle First