This information is for educational purposes. Keyboard work involves small parts, soldering irons, and electronics — work in a ventilated space when soldering, unplug boards before opening them, and modding a board may void its warranty. When in doubt, check the manufacturer's documentation first.
If you want to know how to fix stabilizer rattle, you are already asking the single highest-leverage question in this hobby. I have built and torn down dozens of boards on my own bench, and I will say it flatly: a $40 afternoon spent tuning the stabilizers will do more for how a keyboard sounds and feels than a $200 board swap ever has. The spacebar, the Enter key, the Backspace, the Shifts — every wide key rides on a stabilizer, and a bad one rattles, ticks, and mushes no matter how perfectly you lubed your switches. This is the guide I wish I’d had before my first midnight stab surgery.
Everything below comes off my own lube station — the same one that has processed thousands of switches — recorded the same way every time: one mic, one distance, one desk. No phone-mic mystery audio, no “endgame” marketing. Just what actually changes the rattle and what is myth.
What stabilizer rattle actually is
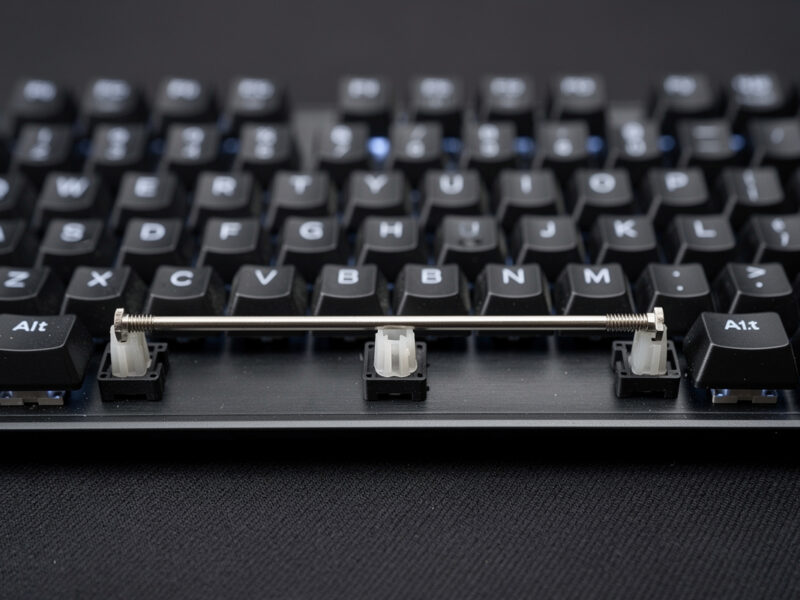
Rattle is the sound of the metal wire and the plastic housing of a stabilizer slapping against each other and against the keycap when you press and release a wide key. A switch has one moving stem in a fixed housing; a stabilizer has a bent steel wire whose two ends sit in plastic “stems” inside two housings, with a long horizontal run of bare wire bridging them. That bare wire is the problem child. When you bottom out the spacebar, the wire pivots, the stem rocks in its housing, and the wire ticks against whatever it touches. Multiply that by the slack a mass-produced stabilizer ships with, and you get the high-pitched tick-tick that ruins an otherwise great board.
There are three independent noise sources, and every fix below targets one or more of them. First, wire tick: the metal end of the wire rattling inside the plastic stem. Second, housing rattle: the stem rocking loosely inside the housing because of manufacturing tolerance slop. Third, wire ring: the long bare span of wire resonating like a tuning fork, the metallic ping tail you hear after the tick. Diagnose which one you have before you reach for a tool, because the fixes are different and stacking the wrong one wastes an hour.
Why stabilizer tuning beats almost every other upgrade
Here is the verdict I keep coming back to after years on the bench: stabilizer tuning is the single highest return-on-effort modification in the entire hobby, full stop. Lubing switches is satisfying and it does change the sound — I cover it in depth elsewhere — but it’s a multi-hour job for a delta most people can only hear in a controlled recording. Stabilizer tuning takes one focused afternoon, touches maybe four to six keys, and the difference is so obvious that a non-hobbyist sitting at the desk will notice it. The reason is simple math: there are only a handful of stabilized keys, but they’re the keys you slam hardest — spacebar, Enter, Backspace, the Shifts. A single rattly spacebar will undercut a $300 board’s worth of careful switch and keycap selection. Fix the stabs and the whole board sounds like it costs more.
This is also why I push back hard on the upgrade treadmill. The hobby is engineered to make you feel like the next board is the answer, that “endgame” is one group buy away. In my experience the person who tunes the stabilizers on their current board and learns to lube their switches gets 80% of what a $400 custom delivers, for the price of a tube of grease. The remaining 20% — gasket mounting feel, premium plate materials, machined aluminum — is real, but it’s diminishing returns. Master the stabilizer first. It’s the skill that transfers to every board you’ll ever own.
The two stabilizer mounting styles you’ll meet
Before you tune anything, you need to know what you’re working with, because it dictates whether you even have to remove the keycaps-and-switches or pull the whole PCB. There are two dominant mounting styles, and the difference matters enough that I wrote a full comparison spoke on screw-in vs plate-mount.
Plate-mount stabilizers clip into cutouts in the metal or polycarbonate plate. They snap in and out from the top without removing the PCB, which is why budget and prebuilt boards ship them — they’re cheaper to assemble. The trade-off is they tend to wobble more and pop loose if a clip is worn. Screw-in stabilizers bolt through the PCB with a tiny screw into a threaded insert or a washer-and-nut on the back. They sit dead-flat and rock-solid, which is why every serious custom uses them — but you have to remove the PCB to install them, which on a soldered board means desoldering nothing (stabs aren’t soldered) but does mean a full teardown.
A third style, snap-in / clip-in PCB-mount, splits the difference: it mounts to the PCB but clips rather than screws, so it’s flatter than plate-mount but can still wiggle if the clips are loose. If you’re unsure which you have, pop one keycap off a wide key and look: if the stabilizer body is attached to the plate around the switch, it’s plate-mount; if you can see it passing through the PCB, it’s PCB-mount of some kind.
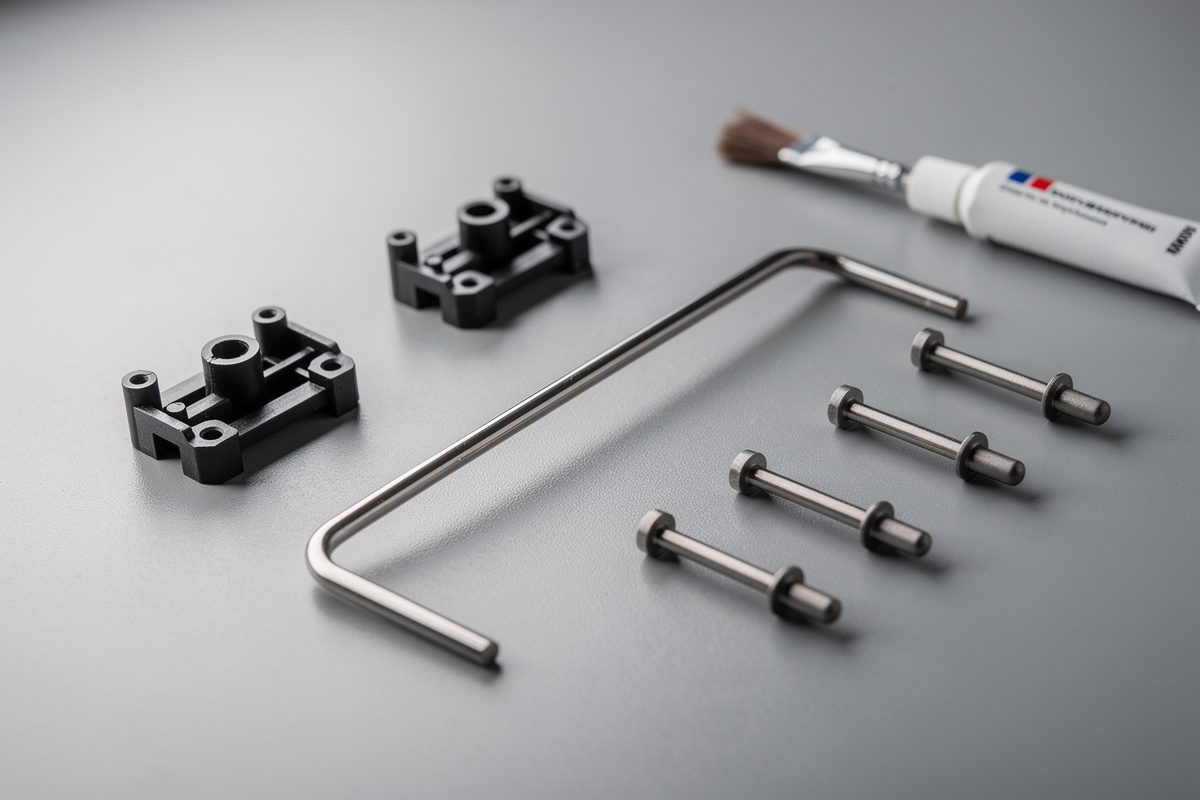
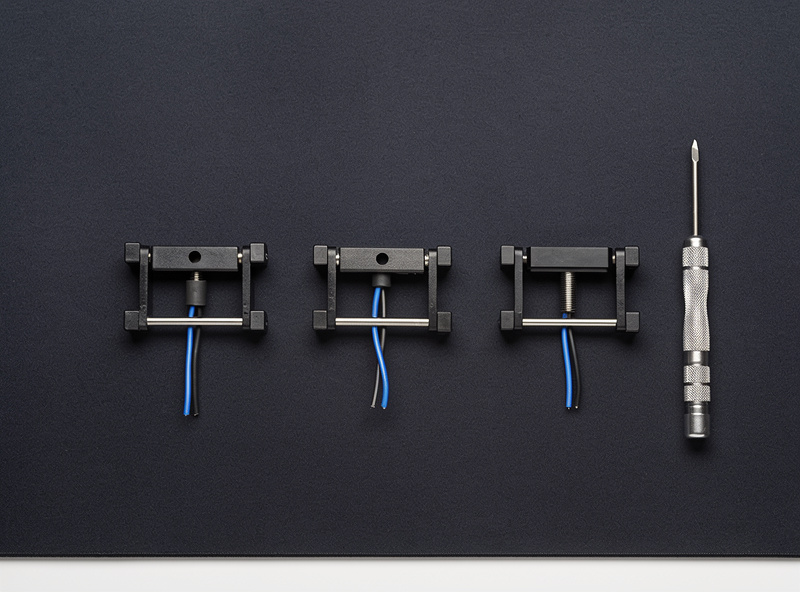
The toolkit that actually tunes a stabilizer
You don’t need much, and most of it does double duty for switch work. Here’s the exact kit on my bench, and what each piece is for:
- A thick dielectric grease for the wire ends — I use Krytox XHT-BDZ on the wire, the heavy stuff that stays put. Some builders use plumber’s silicone grease; either kills wire tick.
- A thin oil-based lube for the housing — Krytox 205g0 is my default, the same grade I lube linear switches with. It quiets the stem-in-housing rattle without gumming up the slide.
- A small precision brush for applying lube into the housing channel.
- Wire cutters and a clipper if you’re clipping the stem feet (more on that below).
- Bandages or dielectric grease pads for the band-aid mod — the cushion under the stem foot.
- A Phillips #00 driver for screw-in stabs.
That’s it. No specialty rig, no group-buy-exclusive miracle product. The “best stabilizers” debate matters less than the tune you give whatever you have.
If you want to assemble the kit, here are the pieces I keep stocked:
- Krytox 205g0 (housing lube)
- Dielectric grease for stabilizer wires
- Fine lube brush set
- Screw-in stabilizer set
Diagnosing your rattle before you touch a tool
Spend two minutes here and you’ll save an hour later. Pull the keycap off the offending key and press the bare stem with a finger, slowly, listening. Then press it fast and hard. Then press just one corner of where the keycap would sit. Each of these isolates a different fault. A slow press that’s silent but a fast press that ticks points at wire-end tick — the metal slapping the plastic channel on the way down. A press that wobbles side to side before it bottoms out points at housing slop — the stem rocking in an over-tolerance housing. A clean press with a ringing metallic tail after the bottom-out is wire ring — the long bare span resonating. And a rattle that only shows up with the keycap on, never on the bare stem, is a keycap fit problem, not a stabilizer problem at all.
I keep a mental decision tree: tick on fast press equals grease the wire; wobble equals lube the housing and consider a tighter stabilizer; ring equals more wire grease and possibly the Holee mod; keycap-only rattle equals a different keycap or a dab of grease on the keycap’s stabilizer mounts. The detailed walkthrough lives in the dedicated rattle-fix guide, and if it’s specifically your spacebar driving you up the wall, the stabilizer rattle fix guide walks the full diagnostic and repair sequence end to end.
The tuning stack, in the order I do it
Here is the full sequence I run on every board, ranked by how much each step actually changes the sound on my recordings. Do them in this order and stop when the rattle is gone — you rarely need all five.
Step 1: Clip the stems (optional, irreversible)
Most stabilizer stems ship with two little plastic feet on the bottom that prevent them from sitting flush, leaving a gap the stem can bounce in. Clipping those feet flush with a flush cutter lets the stem sit flat against the PCB or plate, removing a chunk of the mushy “thock-with-a-tick” return. This is the most debated step because it’s irreversible — clip a stem wrong and you’ve ruined it. I clip mine, but only after I’ve done it enough times to be confident. If you’re new, skip it; the lube and the band-aid will get you 90% of the way.
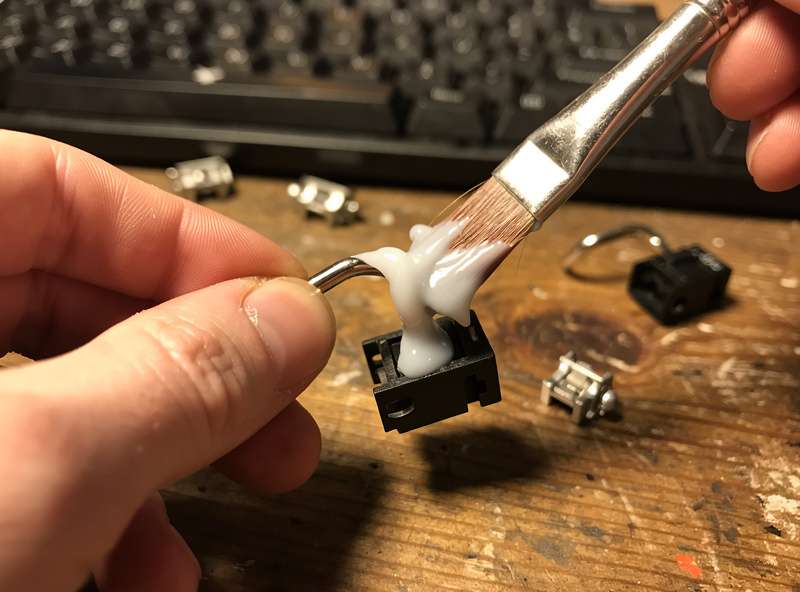
Step 2: Lube the housings and stems
Pull the stabs apart, brush a thin coat of 205g0 into the housing where the stem slides, and a light coat on the stem itself. This kills the friction-tick of plastic-on-plastic. Don’t drown it — excess lube migrates and attracts dust. A thin even film is the whole game.
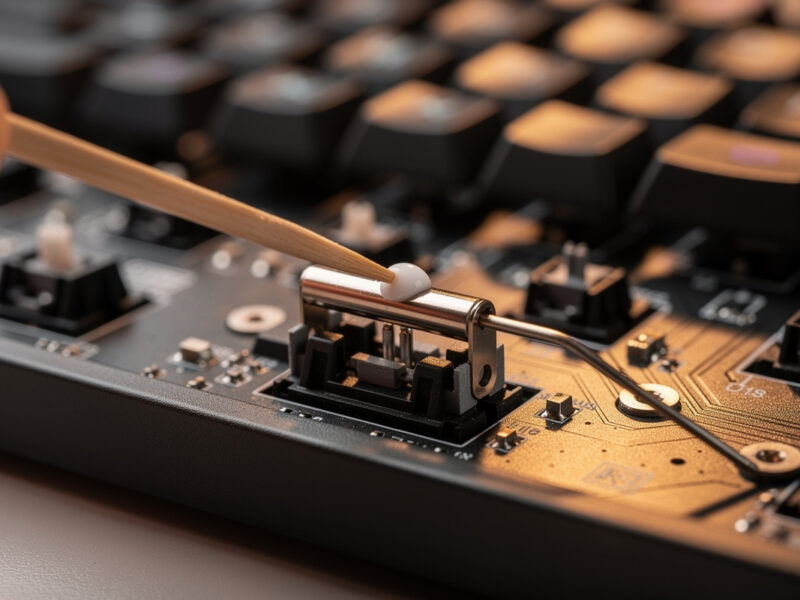
Step 3: Grease the wire ends — the single biggest win
This is the step that matters most. The metal wire ends sit in the stem’s wire channel, and that metal-on-plastic contact is where the loudest tick comes from. Pack a generous blob of thick dielectric grease into the wire channel and on the bent ends of the wire before you reinsert it. On my recordings, this one step removes more rattle than the other four combined. If you do nothing else, do this.
Step 4: The band-aid mod
Cut a small piece of fabric bandage and stick it on the PCB directly under where each stem foot lands. It cushions the bottom-out, softening the slap of the stem hitting the board into a muted thock. There’s a whole spoke on whether the band-aid mod is still relevant — short answer: on a board without PCB foam, yes.
Step 5: The Holee mod
The Holee mod stuffs a tiny sliver of fabric bandage inside the stem’s wire channel so the wire is permanently cushioned against the plastic — it’s a more permanent, fiddlier version of the wire-grease fix. It’s the nuclear option for wire tick. I cover whether it’s worth the eye strain in the Holee mod deep dive.
What if you can’t fully remove the stabilizers?
Sometimes a full teardown isn’t on the table — a soldered board you don’t want to open, a borrowed keyboard, or just a Tuesday night when you don’t have the patience for a PCB pull. There’s a legitimate partial technique for getting lube onto the wire and into the housing with the stabs still mounted: you unhook the wire from one side, swing it out, grease the exposed channel and wire end, and reseat. It won’t reach everything a full teardown does, but for wire tick — the loudest fault — it captures the majority of the win. I wrote the full method up in lubing stabilizers without removing them, including which fixes it can and can’t deliver. It’s not a substitute for doing it right, but it’s a real 20-minute fix when right isn’t available.
Stabilizer tuning across board tiers — what actually changes
People assume an expensive board means good stabilizers out of the box. In my drawer, that’s only half true. The $75 hotswap I use as my value reference ships plate-mount stabs that rattle audibly — and tune up beautifully. The self-soldered aluminum 65% I built came with screw-ins that were dead-flat but bone dry and ticked on the wire until I greased them. The budget 60% I keep stock as the “before” in every comparison has the worst stabs in the house, and it’s the best teaching tool I own precisely because the improvement is so dramatic. The pattern: price buys you a better mounting style and tighter tolerances, not a finished tune. Almost no factory ships a properly greased wire, because the grease that quiets a stabilizer is too thick to apply on an assembly line at scale. So whatever you spent, assume the wire needs grease. The tune is on you, and that’s good news — it means a $40 board and a $400 board are one afternoon apart on the keys you press hardest.
Plate-mount vs screw-in vs clip-in: which tune applies
The mounting style changes the access and the baseline, not the tuning steps themselves. Here’s how the three compare on the things that matter when you’re deciding how far to go:
| Property | Plate-mount | Clip-in PCB | Screw-in |
|---|---|---|---|
| Install access | Top, no teardown | PCB removal | PCB removal |
| Baseline wobble | Highest | Medium | Lowest |
| Pops loose? | Can, if clip worn | Rarely | Never (bolted) |
| Tools needed | None | None | Phillips #00 |
| Found on | Budget / prebuilt | Mid-tier | Customs |
| Tune ceiling | Good | Very good | Best |
The honest takeaway: a well-tuned plate-mount stabilizer sounds better than a stock screw-in. The mounting style sets your ceiling, but the tune is what you actually hear. Don’t let anyone sell you a board swap when the difference was a stock stabilizer.
How I record the before-and-after (so you can trust the verdicts)
Every sound claim on this site comes from the same setup: one cardioid mic at a fixed distance from the same desk, recording at the same gain, on the same board with the same keycaps. I change exactly one variable — the stabilizer tune — and record again. That’s the only way a before-and-after means anything. The genre’s biggest sin is comparing a phone-mic clip of one board to a studio clip of another and calling it a switch difference. If a recording doesn’t state its method, treat the verdict as decoration.
The mistakes that send people back into the board twice
I’ve re-opened boards at 1 a.m. more times than I’ll admit, so learn from my dues:
- Over-lubing. A puddle of 205g0 in the housing migrates onto the wire and changes the feel for the worse within a week. Thin film only.
- Grease where you needed lube and vice versa. Thick dielectric goes on the wire; thin oil goes in the housing. Swap them and you get a sluggish, ticky mess.
- Bent wire. Insert the wire crooked and one side of the spacebar will be higher than the other and tick on every press. Seat both ends fully.
- Skipping the diagnosis. If your noise is wire ring, the band-aid mod does nothing for it — you needed wire grease. Identify the noise first.
- Forgetting the keycap. A loose-fitting spacebar that wobbles on the stabilizer stems will rattle no matter how well the stab is tuned. Sometimes the fix is the keycap, not the stab.
Choosing replacement stabilizers, if it comes to that
Sometimes the stock stabilizer is just bad — a worn clip, a warped housing, tolerances so loose no amount of grease saves them. When that happens, the upgrade is cheap relative to a board swap, and it’s where most of the genuine “stabilizer” money in the hobby lives. My buying rules, learned the hard way: prefer screw-in if your board supports it (the screw-in vs plate-mount comparison covers compatibility), check the wire gauge and bend quality because a poorly bent wire ticks no matter what you do, and don’t pay a premium for “pre-lubed” stabs — they’re never greased on the wire the way you’d do it yourself, so you’ll be tuning them anyway. A mid-priced screw-in set plus your own grease beats a premium “tuned” set every time on my recordings.
A clip-in or screw-in set runs a few dollars per key’s worth of stabilizer, and it’s the rare hobby purchase where the cheap-but-decent option, properly tuned, genuinely matches the boutique one. Spend the savings on lube.
Maintenance: how long a tune lasts
A properly greased stabilizer holds its tune for a long time — I have boards I tuned over a year ago that are still quiet. What kills a tune is over-lubing (excess migrates and gums up), dust (a sticky over-greased housing is a dust magnet), and the wire grease slowly thinning if you used something too light. If a previously quiet stabilizer starts ticking again, it’s almost always the wire grease that’s worn or migrated — pop the keycap, re-grease the wire end, and you’re done in five minutes. You won’t need to redo the whole stack. This is the difference between using a thick dielectric grease on the wire and trying to get away with thin oil there: the thick stuff stays put, which is the entire point.
Where to go next
This hub is the map; the spokes below are the deep dives. Start with the rattle-fix walkthrough if you have a board ticking right now, then read the mounting-style comparison before you buy replacement stabilizers, weigh the Holee mod and band-aid mod for your specific noise, and reach for the no-teardown method when a full strip isn’t worth it. If the spacebar is the culprit, go straight to the spacebar rattle fix.
Frequently asked questions
How do I fix stabilizer rattle without buying new stabilizers?
Pull the wide-key keycaps, separate the stabilizer wire from the housings, pack thick dielectric grease into the wire channels and on the wire ends, brush a thin coat of Krytox 205g0 into the housings, and reassemble. Greasing the wire ends alone removes more rattle than any other single step on my recordings, and it costs nothing if you already lube switches.
Which stabilizer fix makes the biggest difference?
Greasing the metal wire ends with a thick dielectric grease. The loudest tick comes from bare metal wire ticking against the plastic stem channel, and cushioning that contact with heavy grease is the highest-ROI step. Lube, clipping, and the band-aid mod refine it from there.
Do I have to remove the PCB to tune stabilizers?
Only for screw-in or clip-in PCB-mount stabilizers. Plate-mount stabilizers clip in and out from the top, so you can tune them with just the keycaps and switches removed. There is also a partial lubing technique for stabs you cannot fully remove, covered in its own guide.
Is clipping stabilizer stems necessary?
No, and it is irreversible, so it is the one step I tell beginners to skip. Clipping the stem feet flush removes a small amount of mushiness, but lubing and greasing get you most of the way. Clip only once you are confident with the teardown.
Why does my spacebar rattle more than other keys?
The spacebar is the longest key, so its stabilizer wire has the longest unsupported span, the part that resonates and rings. It also gets the most presses and the hardest bottom-outs. A long wire amplifies every noise source, which is why spacebar rattle gets its own dedicated fix.
Will tuning stabilizers void my keyboard warranty?
Removing keycaps and lubing stabs is non-destructive and reversible, except clipping. On a hotswap board it is effectively zero-risk. Check your specific manufacturer terms, but for the vast majority of enthusiast and prebuilt boards, tuning stabilizers is expected hobby behavior, not abuse.
The deep-dive guides in this series
This hub is the map. The detailed walkthroughs each take one piece of the tune and go all the way down: the step-by-step rattle fix for a board ticking right now, the screw-in versus plate-mount comparison for when you’re choosing replacement stabilizers, honest verdicts on whether the Holee mod and the band-aid mod still earn their place in 2026, the no-teardown method for when a full strip isn’t worth it, and the spacebar-specific fix for the loudest key on the board. Work through them in whatever order matches the noise you’re chasing.
Guides in This Series
The full stabilizer-tuning series, in the order most builders work through them:
- Stabilizer Rattle Fix: The Exact Step-by-Step I Use
- Screw-In vs Plate-Mount Stabilizers Compared
- Holee Mod: Is It Still Worth It in 2026?
- Band-Aid Mod for Stabilizers: Still Relevant?
- How to Lube Stabilizers Without Removing Them
- Spacebar Rattle Fix: Silence the Loudest Key
- Switch Lubing and Filming: The Complete Tuning Guide
- Is Lubing Switches Worth It? The Honest Hours-vs-Payoff Math